Important Notes:
This article is applicable if the WiFi system has an older firmware than .65E. If you have a newer SuperSting™ WiFi, please use this article instead. If an older system does need update, the serial type firmware update will be needed before moving to the WiFi firmware method later. The first 2 digits of the serial number are the year of manufacture. Unlike consumer electronics, firmware updates are rarely needed and especially on pre 2013 built systems. Older pre-WiFi systems likely will not need a firmware update unless there is a missing menu feature needed. A reset and default should fix other concerns which are assumed to require a firmware update such as a scrambled menu or file name. This can occur when the system was allowed to run with a battery below specifications and a voltage drop occurred, etc. Check here first on this type of concern: Reset and Default to avoid system down time from stalled firmware update.
We suggest that the firmware is checked from the office between projects to avoid any possible downtime—which may include performing firmware recovery procedures that involve opening the SuperSting™ after serial port adapter issues. NEVER use a USB to serial adapter for these updates.
Firmware updates are rarely needed and especially on pre 2013 built systems. The first two numbers on the serial number are the year of manufacture. Serial SS24xxxx is a SuperSting built in 2024. Please contact AGI if you have an older system to check if a firmware update is needed.
On older systems, firmware changes were used to allow marine streaming mode vs land mode. These older systems needed a land firmware which had more features for land surveys and handled both Dual-Mode and Switchbox roll along with modes of automatic switching, skip electrode list, etc. The marine firmware was primarily for boat towed surveys, but it could handle Switchbox and Dual-Mode surveys if roll-along is not needed. The WiFi systems built-in 2013 onward have a new receiver board that can handle a larger firmware memory that adds additional features such as PoweSting and Marine functions without the need for a firmware swap.
New firmware for the SuperSting™ is available when you connect the App to the internet so that the App can download and store the latest version from Google Play. The AGI SuperSting™ UserGroup is only an archive of older pre 2013 built system firmware files.
Please register as a SuperSting™ owner to receive a password to access this site or contact AGI for assistance with the pre 2013 built units.
The full procedure to perform a firmware update using a serial port:
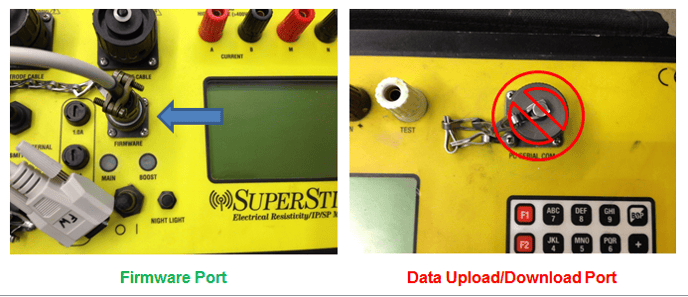
Make sure you download and install the SuperSting™ Administrator software version 1.5.1.235 or newer. Use the special cable for loading firmware into the SuperSting™ (do not mix up this cable with the data upload/download cable). The firmware cable connects to the SuperSting™ in the port labeled "Ext. TX. COM" or "Firmware" as shown in the picture below. The SuperSting™ R1 has this port marked (PC SERIAL COM2).
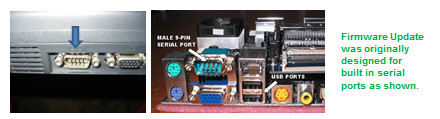
The type of communication used for firmware will not work properly with USB/Serial adapters. For uploading firmware, it is best to use a computer with a built-in serial port as shown in the two images below or a Card Bus Serial Port Adapter (directly connects to motherboard).
Do not use other USB to serial adapters or the firmware will likely fail during the step where it is writing new firmware after erasing the old firmware. This will cause the SuperSting™ to be non-operational until it can be opened for a more involved procedure. If the update fails during the firmware erase step, AGI Technical Support will need to send special instructions that require opening and resetting the SuperSting™ with an internal switch and then loading several different files in a more complex procedure.
To avoid this possibility, please make sure to find a computer with a built-in serial port and stable power supply/fully charged battery or use an approved Card Bus Serial Port Adapter. Typically these types of ports are only found on desktop systems. AGI has tested numerous serial port adapters and none of the USB to Serial Adapters were stable so they should not be used. The XC-235 for laptops with a PCIe slot was stable. The PX-101 PCI-Express card for desktop systems also was stable.
• Make sure your computer can operate for at least 30 minutes without shutting down. Do not use a laptop with a low battery or computer connected to unstable power.
• Turn on the SuperSting™ and go to the main menu.
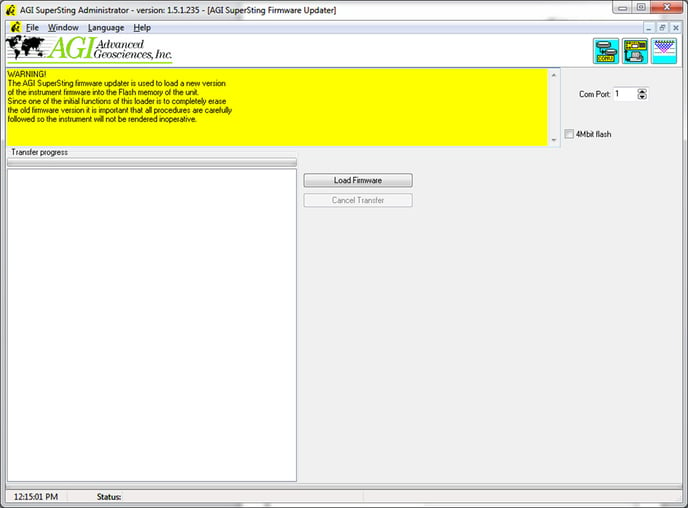
•Start the Administrator for SuperSting™ software.
•Select the AGI SuperSting™ Firmware Updater under the Window option on the Administrator for SuperSting™ menu bar.
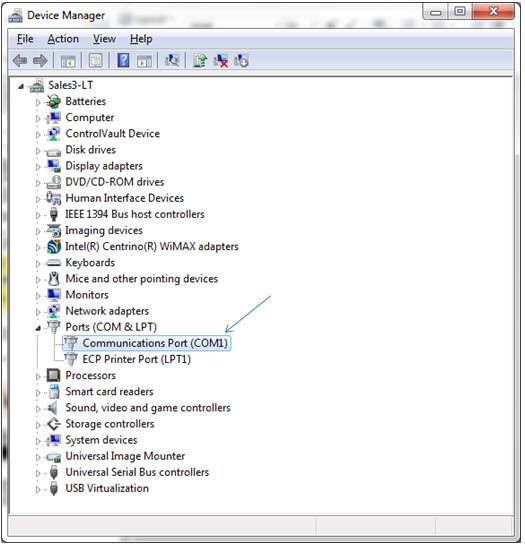
• Make sure to select the correct com port by looking at the Windows Device Manager as shown in this screenshot:
•Click on the “Load firmware” button and select the firmware update file (xxxxx.agi) you want to load.
•In the Administrator Transfer progress window will now be displayed “Successfully loaded image file version x.x.x. Transferring start program to SuperSting™. Start SuperSting™ in boot mode.”
•At this point, on the SuperSting™, go to Menu 6 and select 4. General settings. Then press 2. Start firmware update.
•The software is now being transferred to the SuperSting™. This is a sensitive process, therefore make sure to leave the instrument and computer alone and make sure to not interrupt the power until the process is finished. This may take up to 15 minutes. The blue transfer progress bar will move to the right during this step.
•When the uploading process is finished the progress window will display “Firmware transfer complete, restart SuperSting™!”
•Restart the SuperSting™.
• From the Main Menu:
-Format the memory (Menu 5/4)
-Delete all command files (Menu 5/6)
-Reset the SuperSting™ to the factory defaults (Menu 6/4/4)
-Clear any skip electrodes (Menu 6/6/2)
-Clear the Address Table: (Menu 6/2/2)
•Upload the command files again and set the address tables as needed for a switchbox and cable.
The firmware update is now completed.