Note: Most often a specific array with spacing information is needed. Please use key phrase " MiniSting" plus the array in your specification like "wenner" or "schlumberger" HERE
2.1 Manual mode (from p.18 of the Instruction Manual for the Sting R1 and MiniSting R1)
Proceed as follows: Connect four ground electrode stakes to the current (A and B) and potential (M and N) terminals on the instrument front panel.
With the battery pack attached, turn the instrument on by flipping the ON/OFF (I/O) switch to the ON (I) position.
Before you start measuring, you need to set a few parameters which will stay the same for the whole survey.
- Press the number 1 key to get to menu 1. Press the F1 key and select the array type (electrode configuration) you are going to use. Press "+" or "-" to select from the supported configurations. When the configuration of your choice is displayed on the screen, press the MENu key to get back to menu 1. The chosen configuration will now remain in effect until changed. Select any array except the USER MODE which is only used with the Swift automatic multi-electrode system. Press the MENu key to get back to menu 1.
- Press the F3 key and use the + or - key to select a suitable current setting. If the instrument can not send out the requested current because of local geological conditions, it will automatically switch down to a lower current, which is possible to send out.
- Go to menu 2 (M2) by pressing the number 2 key. Press F1 and use the + or - key to select the number of cycles. Press MEN to get back to menu 2.
- Press F2 and use the + or - key to select a suitable threshold (2% is a recommended value for most surveys) for the error. If the standard deviation of the measurement falls below this value during the stacking, the measurement is automatically interrupted and the reading is stored in the internal memory. Press MEN to get back to menu 2.
- Press F3 followed by F1 to select feet or meters for units.
- Press F2 to select 3.6 sec measurement time. Press MEN to get back to menu 2
- Go to menu 3 by pressing the number 3 key. Press F3/F1 followed by the . (dot) key to erase the memory from previously recorded data. Make sure that all important data in memory are downloaded to a computer prior to erasing the memory. Press MEN to get back to menu 3.
- Press the number 4 key to get to menu 4 (M4) on the display. Press F1 to set date and time
- Make sure the automatic measurement mode (only used with the Swift automatic electrode system) is turned off, by pressing the number 6 key to get to menu 6 and then pressing F1. Set the mode to Off by pressing the + key. Press the MENu key to get back to menu 6. You are now ready to start measuring.
- Go to menu 1 (M1) and press F2 to enter electrode distances. When the distances are entered by pressing F3, the display is automatically changed back to menu 1. The instrument is now ready for measurement.
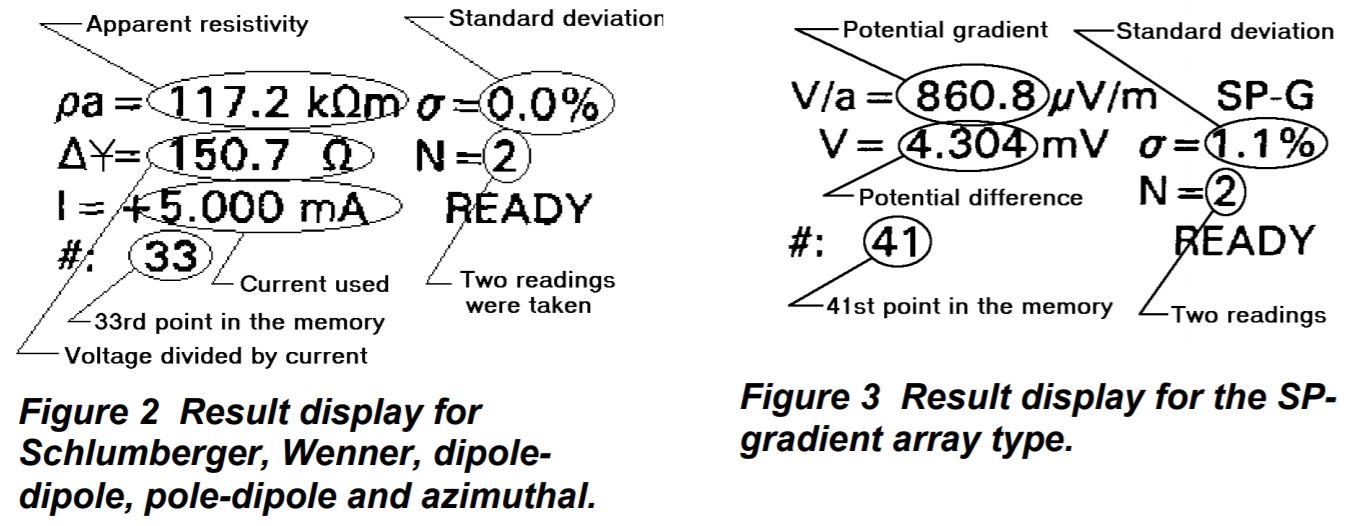
- Press the MEAsurement key to start your measurement cycle. Measured data will automatically be stored in the memory and can later be downloaded to a computer using the “Stingdump” down load module of the Administrator software (see section 6.1.9 belowThe Sting Measurement Download Module. If the displayed error σ is too large, you may want to repeat the measurement or you may want to increase the output current (Menu1 F3) and measure again.
- After the first reading is taken, go to step 10 above to change the electrode distances and start a new measurement.
The measurement result is displayed on the LCD screen. The result screen differs somewhat for the different array types used (see below).